图像处理
Tensorflow封装了很多图像处理的操作,包括读取图像、图像处理、写图像到文件等等。在批量处理图像时,Tensorflow要求所有的图像都要有相同的Size,即$$(height,width,channels)$$。
读取图像
%matplotlib inline
import tensorflow as tf
import numpy as np
#mil.use('svg')
mil.use("nbagg")
from matplotlib import pyplot
import matplotlib as mil
sess = tf.InteractiveSession()
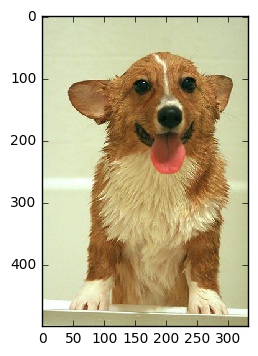
image_filename = "n02113023_219.jpg"
filename_queue = tf.train.string_input_producer(
tf.train.match_filenames_once(image_filename))
image_reader = tf.WholeFileReader()
_, image_file = image_reader.read(filename_queue)
image = tf.image.decode_jpeg(image_file)
sess.run(tf.initialize_all_variables())
coord = tf.train.Coordinator()
threads = tf.train.start_queue_runners(coord=coord)
# Rank 3 tensor in format:
# [batch_size, image_height, image_width, channels]
print sess.run(image)
pyplot.imshow(sess.run(image), interpolation='nearest')
filename_queue.close(cancel_pending_enqueues=True)
coord.request_stop()
coord.join(threads)
图像格式
Tensorflow支持JPEG和PNG格式(tf.image.decode_jpeg和tf.image.decode_png)。
ensorFlow has two image formats used to decode image data, one is tf.image.decode_jpeg and the other is tf.image.decode_png. These are common file formats in computer vision applications because they’re trivial to convert other formats to.
Something important to keep in mind, JPEG images don’t store any alpha channel information and PNG images do. This could be important if what you’re training on requires alpha information (transparency). An example usage scenario is one where you’ve manually cut out some pieces of an image, for example, irrelevant jester hats on dogs. Setting those pieces to black would make them seem of similar importance to other black colored items in the image. Setting the removed hat to have an alpha of 0 would help in distinguishing its removal.
When working with JPEG images, don’t manipulate them too much because it’ll leave artifacts. Instead, plan to take raw images and export them to JPEG while doing any manipulation needed. Try to manipulate images before loading them whenever possible to save time in training.
PNG images work well if manipulation is required. PNG format is lossless so it’ll keep all the information from the original file (unless they’ve been resized or downsampled). The downside to PNGs is that the files are larger than their JPEG counterpart.
TFRecord
TensorFlow has a built-in file format designed to keep binary data and label (category for training) data in the same file. The format is called TFRecord and the format requires a preprocessing step to convert images to a TFRecord format before training. The largest benefit is keeping each input image in the same file as the label associated with it.
Technically, TFRecord files are protobuf formatted files. They are great for use as a preprocessed format because they aren’t compressed and can be loaded into memory quickly. In this example, an image is written to a new TFRecord formatted file and it’s label is stored as well.
# Reuse the image from earlier and give it a fake label
image_label = b'\x01'  # Assume the label data is in a one-hot representation (00000001)

# Convert the tensor into bytes, notice that this will load the entire image file
image_loaded = sess.run(image)
image_bytes = image_loaded.tobytes()
image_height, image_width, image_channels = image_loaded.shape

# Export TFRecord
writer = tf.python_io.TFRecordWriter("training-image.tfrecord")

# Don't store the width, height or image channels in this Example file to save space but not required.
example = tf.train.Example(features=tf.train.Features(feature={
            'label': tf.train.Feature(bytes_list=tf.train.BytesList(value=[image_label])),
            'image': tf.train.Feature(bytes_list=tf.train.BytesList(value=[image_bytes]))
        }))

# This will save the example to a text file tfrecord
writer.write(example.SerializeToString())
writer.close()
# Load TFRecord
tf_record_filename_queue = tf.train.string_input_producer(
    tf.train.match_filenames_once("training-image.tfrecord"))

# Notice the different record reader, this one is designed to work with TFRecord files which may
# have more than one example in them.
tf_record_reader = tf.TFRecordReader()
_, tf_record_serialized = tf_record_reader.read(tf_record_filename_queue)

# The label and image are stored as bytes but could be stored as int64 or float64 values in a
# serialized tf.Example protobuf.
tf_record_features = tf.parse_single_example(
    tf_record_serialized,
    features={
        'label': tf.FixedLenFeature([], tf.string),
        'image': tf.FixedLenFeature([], tf.string),
    })

# Using tf.uint8 because all of the channel information is between 0-255
tf_record_image = tf.decode_raw(
    tf_record_features['image'], tf.uint8)

# Reshape the image to look like the image saved, not required
tf_record_image = tf.reshape(
    tf_record_image,
    [image_height, image_width, image_channels])
# Use real values for the height, width and channels of the image because it's required
# to reshape the input.

tf_record_label = tf.cast(tf_record_features['label'], tf.string)

# Check that the image saved to disk is the same as the image which was loaded from TensorFlow.
sess.close()
sess = tf.InteractiveSession()
sess.run(tf.initialize_all_variables())
coord = tf.train.Coordinator()
threads = tf.train.start_queue_runners(coord=coord)
print sess.run(tf.reduce_mean(tf.cast(tf.equal(tf_record_image, image),
                                           tf.float32))) # => 1.0
tf_record_filename_queue.close(cancel_pending_enqueues=True)
coord.request_stop()
coord.join(threads)
图像操作
CNNs work well when they’re given a large amount of diverse quality training data. Images capture complex scenes in a way which visually communicates an intended subject. In the Stanford Dog’s Dataset, it’s important that the images visually highlight the importance of dogs in the picture. A picture with a dog clearly visible in the center is considered more valuable than one with a dog in the background.
Not all datasets have the most valuable images. The following are two images from the Stanford Dogs Dataset which are supposed to highlight dog breeds. The image on the left n02113978_3480.jpg highlights important attributes of a typical Mexican Hairless Dog, while the image on the right n02113978_1030.jpg highlights the look of inebriated party goers scaring a Mexican Hairless Dog. The image on the right n02113978_1030.jpg is filled with irrelevant information which may train a CNN to categorize party goer faces instead of Mexican Hairless Dog breeds. Images like this may still include an image of a dog and could be manipulated to highlight the dog instead of people.
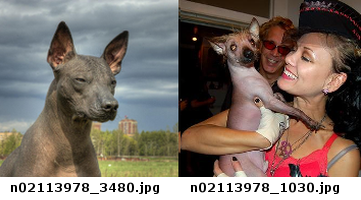
Image manipulation is best done as a preprocessing step in most scenarios. An image can be cropped, resized and the color levels adjusted. On the other hand, there is an important use case for manipulating an image while training. After an image is loaded, it can be flipped or distorted to diversify the input training information used with the network. This step adds further processing time but helps with overfitting.
TensorFlow is not designed as an image manipulation framework. There are libraries available in Python which support more image manipulation than TensorFlow (PIL and OpenCV). For TensorFlow, we’ll summarize a few useful image manipulation features available which are useful in training CNNs.
Cropping
Cropping an image will remove certain regions of the image without keeping any information. Cropping is similar to tf.slice where a section of a tensor is cut out from the full tensor. Cropping an input image for a CNN can be useful if there is extra input along a dimension which isn’t required. For example, cropping dog pictures where the dog is in the center of the images to reduce the size of the input.
sess.run(tf.image.central_crop(image, 0.1))
array([[[ 3, 108, 233]]], dtype=uint8)
The example code uses tf.image.central_crop to crop out 10% of the image and return it. This method always returns based on the center of the image being used.
Cropping is usually done in preprocessing but it can be useful when training if the background is useful. When the background is useful then cropping can be done while randomizing the center offset of where the crop begins.
# This crop method only works on real value input.
real_image = sess.run(image)

bounding_crop = tf.image.crop_to_bounding_box(
    real_image, offset_height=0, offset_width=0, target_height=2, target_width=1)

sess.run(bounding_crop)
array([[[  0,   0,   0]],

       [[  0, 191,   0]]], dtype=uint8)
The example code uses tf.image.crop_to_bounding_box in order to crop the image starting at the upper left pixel located at (0, 0). Currently, the function only works with a tensor which has a defined shape so an input image needs to be executed on the graph first.
Padding
Pad an image with zeros in order to make it the same size as an expected image. This can be accomplished using tf.pad but TensorFlow has another function useful for resizing images which are too large or too small. The method will pad an image which is too small including zeros along the edges of the image. Often, this method is used to resize small images because any other method of resizing with distort the image.
# This padding method only works on real value input.
real_image = sess.run(image)

pad = tf.image.pad_to_bounding_box(
    real_image, offset_height=0, offset_width=0, target_height=4, target_width=4)

sess.run(pad)
array([[[  0,   0,   0],
        [255, 255, 255],
        [254,   0,   0],
        [  0,   0,   0]],

       [[  0, 191,   0],
        [  3, 108, 233],
        [  0, 191,   0],
        [  0,   0,   0]],

       [[254,   0,   0],
        [255, 255, 255],
        [  0,   0,   0],
        [  0,   0,   0]],

       [[  0,   0,   0],
        [  0,   0,   0],
        [  0,   0,   0],
        [  0,   0,   0]]], dtype=uint8)
This example code increases the images height by one pixel and its width by a pixel as well. The new pixels are all set to 0. Padding in this manner is useful for scaling up an image which is too small. This can happen if there are images in the training set with a mix of aspect ratios. TensorFlow has a useful shortcut for resizing images which don’t match the same aspect ratio using a combination of pad and crop.
# This padding method only works on real value input.
real_image = sess.run(image)

crop_or_pad = tf.image.resize_image_with_crop_or_pad(
    real_image, target_height=2, target_width=5)

sess.run(crop_or_pad)
array([[[  0,   0,   0],
        [  0,   0,   0],
        [255, 255, 255],
        [254,   0,   0],
        [  0,   0,   0]],

       [[  0,   0,   0],
        [  0, 191,   0],
        [  3, 108, 233],
        [  0, 191,   0],
        [  0,   0,   0]]], dtype=uint8)
The real_image has been reduced in height to be 2 pixels tall and the width has been increased by padding the image with zeros. This function works based on the center of the image input.
Flipping
Flipping an image is exactly what it sounds like. Each pixel’s location is reversed horizontally or vertically. Technically speaking, flopping is the term used when flipping an image vertically. Terms aside, flipping images is useful with TensorFlow to give different perspectives of the same image for training. For example, a picture of an Australian Shepherd with crooked left ear could be flipped in order to allow matching of crooked right ears.
TensorFlow has functions to flip images vertically, horizontally and choose randomly. The ability to randomly flip an image is a useful method to keep from overfitting a model to flipped versions of images.
top_left_pixels = tf.slice(image, [0, 0, 0], [2, 2, 3])

flip_horizon = tf.image.flip_left_right(top_left_pixels)
flip_vertical = tf.image.flip_up_down(flip_horizon)

sess.run([top_left_pixels, flip_vertical])
[array([[[  0,   0,   0],
         [255, 255, 255]],

        [[  0, 191,   0],
         [  3, 108, 233]]], dtype=uint8), array([[[  3, 108, 233],
         [  0, 191,   0]],

        [[255, 255, 255],
         [  0,   0,   0]]], dtype=uint8)]
This example code flips a subset of the image horizontally and then vertically. The subset is used with tf.slice because the original image flipped returns the same images (for this example only). The subset of pixels illustrates the change which occurs when an image is flipped. tf.image.flip_left_right and tf.image.flip_up_down both operate on tensors which are not limited to images. These will flip an image a single time, randomly flipping an image is done using a separate set of functions.
top_left_pixels = tf.slice(image, [0, 0, 0], [2, 2, 3])

random_flip_horizon = tf.image.random_flip_left_right(top_left_pixels)
random_flip_vertical = tf.image.random_flip_up_down(random_flip_horizon)

sess.run(random_flip_vertical)
array([[[  3, 108, 233],
        [  0, 191,   0]],

       [[255, 255, 255],
        [  0,   0,   0]]], dtype=uint8)
This example does the same logic as the example before except that the output is random. Every time this runs, a different output is expected. There is a parameter named seed which may be used to control how random the flipping occurs.
Saturation and Balance
Images which are found on the internet are often edited in advance. For instance, many of the images found in the Stanford Dogs dataset have too much saturation (lots of color). When an edited image is used for training, it may mislead a CNN model into finding patterns which are related to the edited image and not the content in the image.
TensorFlow has useful functions which help in training on images by changing the saturation, hue, contrast and brightness. The functions allow for simple manipulation of these image attributes as well as randomly altering these attributes. The random altering is useful in training in for the same reason randomly flipping an image is useful. The random attribute changes help a CNN be able to accurately match a feature in images which have been edited or were taken under different lighting.
example_red_pixel = tf.constant([254., 2., 15.])
adjust_brightness = tf.image.adjust_brightness(example_red_pixel, 0.2)

sess.run(adjust_brightness)
array([ 254.19999695, 2.20000005, 15.19999981], dtype=float32)
This example brightens a single pixel, which is primarily red, with a delta of 0.2. Unfortunately, in the current version of TensorFlow 0.8, this method doesn’t work well with a tf.uint8 input. It’s best to avoid using this when possible and preprocess brightness changes.
adjust_contrast = tf.image.adjust_contrast(image, -.5)

sess.run(tf.slice(adjust_contrast, [1, 0, 0], [1, 3, 3]))
array([[[170,  71, 124],
        [168, 112,   7],
        [170,  71, 124]]], dtype=uint8)
The example code changes the contrast by -0.5 which makes the new version of the image fairly unrecognizable. Adjusting contrast is best done in small increments to keep from blowing out an image. Blowing out an image means the same thing as saturating a neuron, it reached its maximum value and can’t be recovered. With contrast changes, an image can become completely white and completely black from the same adjustment.
The tf.slice operation is for brevity, highlighting one of the pixels which has changed. It is not required when running this operation.
adjust_hue = tf.image.adjust_hue(image, 0.7)

sess.run(tf.slice(adjust_hue, [1, 0, 0], [1, 3, 3]))
array([[[191,  38,   0],
        [ 62, 233,   3],
        [191,  38,   0]]], dtype=uint8)
The example code adjusts the hue found in the image to make it more colorful. The adjustment accepts a delta parameter which controls the amount of hue to adjust in the image.
adjust_saturation = tf.image.adjust_saturation(image, 0.4)

sess.run(tf.slice(adjust_saturation, [1, 0, 0], [1, 3, 3]))
array([[[114, 191, 114],
        [141, 183, 233],
        [114, 191, 114]]], dtype=uint8)
The code is similar to adjusting the contrast. It is common to oversaturate an image in order to identify edges because the increased saturation highlights changes in colors.
Colors
CNNs are commonly trained using images with a single color. When an image has a single color it is said to use a grayscale colorspace meaning it uses a single channel of colors. For most computer vision related tasks, using grayscale is reasonable because the shape of an image can be seen without all the colors. The reduction in colors equates to a quicker to train image. Instead of a 3 component rank 1 tensor to describe each color found with RGB, a grayscale image requires a single component rank 1 tensor to describe the amount of gray found in the image.
Although grayscale has benefits, it’s important to consider applications which require a distinction based on color. Color in images is challenging to work with in most computer vision because it isn’t easy to mathematically define the similarity of two RGB colors. In order to use colors in CNN training, it’s useful to convert the colorspace the image is natively in.
Grayscale
Grayscale has a single component to it and has the same range of color as RGB \([0, 255]\).
gray = tf.image.rgb_to_grayscale(image)

sess.run(tf.slice(gray, [0, 0, 0], [1, 3, 1]))
array([[[  0],
        [255],
        [ 76]]], dtype=uint8)
This example converted the RGB image into grayscale. The tf.slice operation took the top row of pixels out to investigate how their color has changed. The grayscale conversion is done by averaging all the color values for a pixel and setting the amount of grayscale to be the average.
HSV
Hue, saturation and value are what make up HSV colorspace. This space is represented with a 3 component rank 1 tensor similar to RGB. HSV is not similar to RGB in what it measures, it’s measuring attributes of an image which are closer to human perception of color than RGB. It is sometimes called HSB, where the B stands for brightness.
hsv = tf.image.rgb_to_hsv(tf.image.convert_image_dtype(image, tf.float32))

sess.run(tf.slice(hsv, [0, 0, 0], [3, 3, 3]))
array([[[ 0.        ,  0.        ,  0.        ],
        [ 0.        ,  0.        ,  1.        ],
        [ 0.        ,  1.        ,  0.99607849]],

       [[ 0.33333334,  1.        ,  0.74901962],
        [ 0.59057975,  0.98712444,  0.91372555],
        [ 0.33333334,  1.        ,  0.74901962]],

       [[ 0.        ,  1.        ,  0.99607849],
        [ 0.        ,  0.        ,  1.        ],
        [ 0.        ,  0.        ,  0.        ]]], dtype=float32)
RGB
RGB is the colorspace which has been used in all the example code so far. It’s broken up into a 3 component rank 1 tensor which includes the amount of red [0, 255], green [0, 255] and blue [0, 255]. Most images are already in RGB but TensorFlow has builtin functions in case the images are in another colorspace.
rgb_hsv = tf.image.hsv_to_rgb(hsv)
rgb_grayscale = tf.image.grayscale_to_rgb(gray)
The example code is straightforward except that the conversion from grayscale to RGB doesn’t make much sense. RGB expects three colors while grayscale only has one. When the conversion occurs, the RGB values are filled with the same value which is found in the grayscale pixel.
Lab
Lab is not a colorspace which TensorFlow has native support for. It’s a useful colorspace because it can map to a larger number of perceivable colors than RGB. Although TensorFlow doesn’t support this natively, it is a colorspace which is often used in professional settings. Another Python library python-colormath has support for Lab conversion as well as other colorspaces not described here.
The largest benefit using a Lab colorspace is it maps closer to humans perception of the difference in colors than RGB or HSV. The euclidean distance between two colors in a Lab colorspace are somewhat representative of how different the colors look to a human.
Casting Images
In these examples, tf.to_float is often used in order to illustrate changing an image’s type to another format. For examples, this works OK but TensorFlow has a built in function to properly scale values as they change types. tf.image.convert_image_dtype(image, dtype, saturate=False) is a useful shortcut to change the type of an image from tf.uint8 to tf.float.