容器安全
从安全的角度来看,Kubernetes 中包含如下图所示的潜在攻击面:
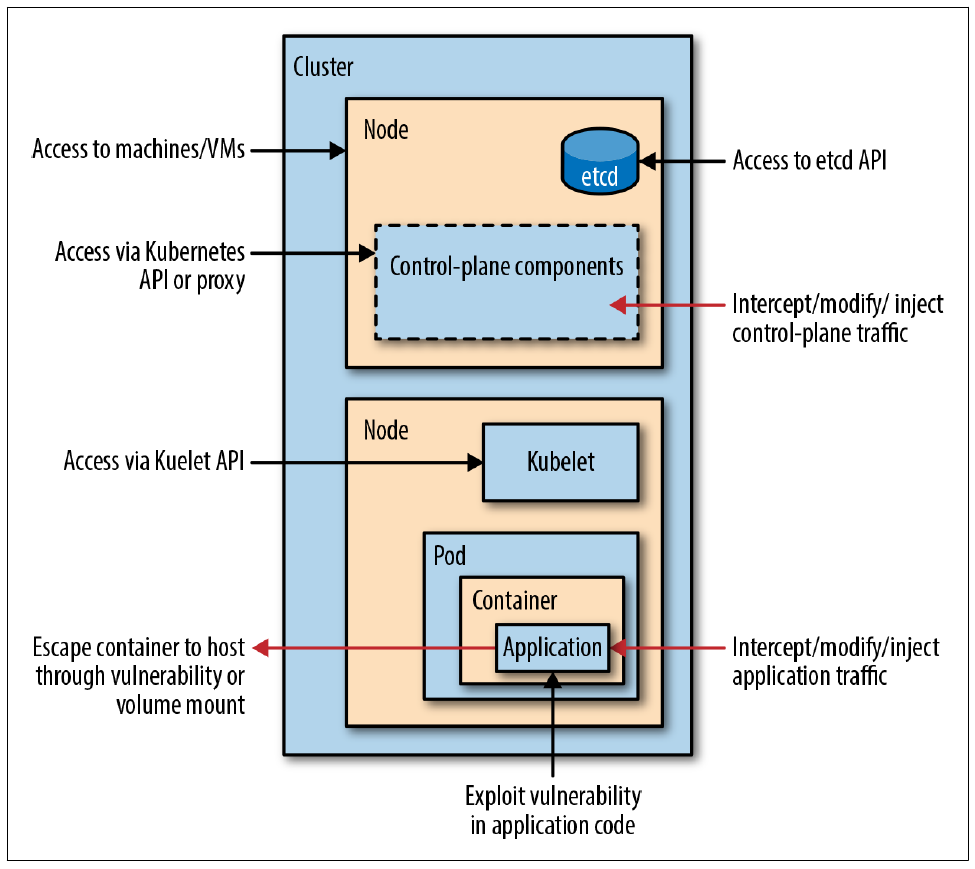
(图片来自《Kubernetes Security - Operating Kubernetes Clusters and Applications Safely》)
为了保证集群以及容器应用的安全,Kubernetes 提供了多种安全机制,限制容器的行为,减少容器和集群的攻击面,保证整个系统的安全性。
- 集群安全,比如组件(如 kube-apiserver、etcd、kubelet 等)只开放安全 API并开启 TLS 认证、开启 RBAC 等;
- Security Context:限制容器的行为,包括 Capabilities、ReadOnlyRootFilesystem、Privileged、RunAsNonRoot、RunAsUser 以及 SELinuxOptions 等;
- Pod Security Policy:集群级的 Pod 安全策略,自动为集群内的 Pod 和 Volume 设置 Security Context;
- Sysctls:允许容器设置内核参数,分为安全 Sysctls 和非安全 Sysctls;
- AppArmor:限制应用的访问权限;
- Network Policies:精细控制容器应用和集群中的网络访问;
- Seccomp:Secure computing mode 的缩写,限制容器应用可执行的系统调用。
除此之外,推荐尽量使用较新版本的 Kubernetes,因为它们通常会包含常见安全问题的修复。你可以参考 kubernetes-announce 来查询最新的 Kubernetes 发布情况,也可以参考 cvedetails.com 查询 Kubernetes 各个版本的 CVE (Common Vulnerabilities and Exposures) 列表。
集群安全
- Kubernetes 组件(如 kube-apiserver、etcd、kubelet 等)只开放安全 API 并开启 TLS 认证。
- 开启 RBAC 授权,赋予容器应用最小权限,并开启 NodeRestriction 准入控制(限制 Kubelet 权限)。
- RBAC 规则过多或者无法满足实际需要时,推荐使用 Open Policy Agent (OPA) 配置更灵活的访问策略
- 开启 Secret 加密存储(Secret Encryption),并配置 etcd 的 TLS 认证;
- 禁止 Kubelet 的匿名访问和只读端口,开启 Kubelet 的证书轮替更新(Certificate Rotation)。
- 禁止默认 ServiceAccount 的 automountServiceAccountToken,并在需要时创建容器应用的专用 ServiceAccount。
- 禁止 Dashboard 的匿名访问,通过 RBAC 限制 Dashboard 的访问权限,并确保 Dashboard 仅可在内网访问(通过 kubectl proxy)。
- 定期运行 CIS Kubernetes Benchmark,确保集群的配置或更新符合最佳的安全实践(使用 kube-bench 和 kube-hunter)。
- 在多租户场景中,还可以使用 Kata Containers、gVisor 等对容器进程进行强隔离,或者使用 Istio、Linkerd 等对容器应用之间的通信也进行自动加密。
TLS 安全
为保障 TLS 安全,并避免 Zombie POODLE and GOLDENDOODLE Vulnerabilities,请为 TLS 1.2 禁止 CBC (Cipher Block Chaining) 模式。
你可以使用 https://www.ssllabs.com/ 来测试 TLS 的安全问题。
Security Context 和 Pod Security Policy
apiVersion: extensions/v1beta1
kind: PodSecurityPolicy
metadata:
  name: restricted
  annotations:
    # Seccomp v1.11 使用 'runtime/default',而 v1.10 及更早版本使用 'docker/default'
    seccomp.security.alpha.kubernetes.io/allowedProfileNames: 'runtime/default'
    seccomp.security.alpha.kubernetes.io/defaultProfileName:  'runtime/default'
    apparmor.security.beta.kubernetes.io/allowedProfileNames: 'runtime/default'
    apparmor.security.beta.kubernetes.io/defaultProfileName:  'runtime/default'
spec:
  privileged: false
  # Required to prevent escalations to root.
  allowPrivilegeEscalation: false
  # This is redundant with non-root + disallow privilege escalation,
  # but we can provide it for defense in depth.
  requiredDropCapabilities:
    - ALL
  # Allow core volume types.
  volumes:
    - 'configMap'
    - 'emptyDir'
    - 'projected'
    - 'secret'
    - 'downwardAPI'
    # Assume that persistentVolumes set up by the cluster admin are safe to use.
    - 'persistentVolumeClaim'
  hostNetwork: false
  hostIPC: false
  hostPID: false
  runAsUser:
    # Require the container to run without root privileges.
    rule: 'MustRunAsNonRoot'
  seLinux:
    # This policy assumes the nodes are using AppArmor rather than SELinux.
    rule: 'RunAsAny'
  supplementalGroups:
    rule: 'MustRunAs'
    ranges:
      # Forbid adding the root group.
      - min: 1
        max: 65535
  fsGroup:
    rule: 'MustRunAs'
    ranges:
      # Forbid adding the root group.
      - min: 1
        max: 65535
  readOnlyRootFilesystem: false
完整参考见这里。
Sysctls
Sysctls 允许容器设置内核参数,分为安全 Sysctls 和非安全 Sysctls
- 安全 Sysctls:即设置后不影响其他 Pod 的内核选项,只作用在容器 namespace 中,默认开启。包括以下几种
kernel.shm_rmid_forcednet.ipv4.ip_local_port_rangenet.ipv4.tcp_syncookies
- 非安全 Sysctls:即设置好有可能影响其他 Pod 和 Node 上其他服务的内核选项,默认禁止。如果使用,需要管理员在配置 kubelet 时开启,如
kubelet --experimental-allowed-unsafe-sysctls 'kernel.msg*,net.ipv4.route.min_pmtu'
Sysctls 在 v1.11 升级为 Beta 版,可以通过 PSP spec 直接设置,如
apiVersion: policy/v1beta1
kind: PodSecurityPolicy
metadata:
  name: sysctl-psp
spec:
  allowedUnsafeSysctls:
  - kernel.msg*
  forbiddenSysctls:
  - kernel.shm_rmid_forced
而 v1.10 及更早版本则为 Alpha 阶段,需要通过 Pod annotation 设置,如:
apiVersion: v1
kind: Pod
metadata:
  name: sysctl-example
  annotations:
    security.alpha.kubernetes.io/sysctls: kernel.shm_rmid_forced=1
    security.alpha.kubernetes.io/unsafe-sysctls: net.ipv4.route.min_pmtu=1000,kernel.msgmax=1 2 3
spec:
  ...
AppArmor
AppArmor(Application Armor) 是 Linux 内核的一个安全模块,允许系统管理员将每个程序与一个安全配置文件关联,从而限制程序的功能。通过它你可以指定程序可以读、写或运行哪些文件,是否可以打开网络端口等。作为对传统 Unix 的自主访问控制模块的补充,AppArmor 提供了强制访问控制机制。
在使用 AppArmor 之前需要注意
- Kubernetes 版本 >=v1.4
- apiserver 和 kubelet 已开启 AppArmor 特性,
--feature-gates=AppArmor=true - 已开启 apparmor 内核模块,通过
cat /sys/module/apparmor/parameters/enabled查看 - 仅支持 docker container runtime
- AppArmor profile 已经加载到内核,通过
cat /sys/kernel/security/apparmor/profiles查看
AppArmor 还在 alpha 阶段,需要通过 Pod annotation container.apparmor.security.beta.kubernetes.io/<container_name> 来设置。可选的值包括
runtime/default: 使用 Container Runtime 的默认配置localhost/<profile_name>: 使用已加载到内核的 AppArmor profile
$ sudo apparmor_parser -q <<EOF
#include <tunables/global>

profile k8s-apparmor-example-deny-write flags=(attach_disconnected) {
  #include <abstractions/base>

  file,

  # Deny all file writes.
  deny /** w,
}
EOF'

$ kubectl create -f /dev/stdin <<EOF
apiVersion: v1
kind: Pod
metadata:
  name: hello-apparmor
  annotations:
    container.apparmor.security.beta.kubernetes.io/hello: localhost/k8s-apparmor-example-deny-write
spec:
  containers:
  - name: hello
    image: busybox
    command: ["sh", "-c", "echo'Hello AppArmor!'&& sleep 1h"]
EOF
pod "hello-apparmor" created

$ kubectl exec hello-apparmor cat /proc/1/attr/current
k8s-apparmor-example-deny-write (enforce)

$ kubectl exec hello-apparmor touch /tmp/test
touch: /tmp/test: Permission denied
error: error executing remote command: command terminated with non-zero exit code: Error executing in Docker Container: 1
Seccomp
Seccomp 是 Secure computing mode 的缩写,它是 Linux 内核提供的一个操作,用于限制一个进程可以执行的系统调用.Seccomp 需要有一个配置文件来指明容器进程允许和禁止执行的系统调用。
在 Kubernetes 中,需要将 seccomp 配置文件放到 /var/lib/kubelet/seccomp 目录中(可以通过 kubelet 选项 --seccomp-profile-root 修改)。比如禁止 chmod 的格式为
$ cat /var/lib/kubelet/seccomp/chmod.json
{
    "defaultAction": "SCMP_ACT_ALLOW",
    "syscalls": [
        {
            "name": "chmod",
            "action": "SCMP_ACT_ERRNO"
        }
    ]
}
Seccomp 还在 alpha 阶段,需要通过 Pod annotation 设置,包括
security.alpha.kubernetes.io/seccomp/pod:应用到该 Pod 的所有容器security.alpha.kubernetes.io/seccomp/container/<container name>:应用到指定容器
而 value 有三个选项
runtime/default: 使用 Container Runtime 的默认配置unconfined: 允许所有系统调用localhost/<profile-name>: 使用 Node 本地安装的 seccomp,需要放到/var/lib/kubelet/seccomp目录中
比如使用刚才创建的 seccomp 配置:
apiVersion: v1
kind: Pod
metadata:
  name: trustworthy-pod
  annotations:
    seccomp.security.alpha.kubernetes.io/pod: localhost/chmod
spec:
  containers:
    - name: trustworthy-container
      image: sotrustworthy:latest
kube-bench
kube-bench 提供了一个简单的工具来检查 Kubernetes 的配置(包括 master 和 node)是否符合最佳的安全实践(基于 CIS Kubernetes Benchmark)。
推荐所有生产环境的 Kubernetes 集群定期运行 kube-bench,保证集群配置符合最佳的安全实践。
安装 kube-bench:
$ docker run --rm -v `pwd`:/host aquasec/kube-bench:latest install
$ ./kube-bench <master|node>
当然,kube-bench 也可以直接在容器内运行,比如通常对 Master 和 Node 的检查命令分别为:
$ kubectl apply -f https://github.com/feiskyer/kubernetes-handbook/raw/master/examples/job-master.yaml
job.batch/kube-bench-master created

$ kubectl apply -f https://github.com/feiskyer/kubernetes-handbook/raw/master/examples/job-node.yaml
job.batch/kube-bench-node created

# Wait for a few seconds for the job to complete
$ kubectl get pods
NAME                      READY   STATUS      RESTARTS   AGE
kube-bench-master-k7jdd   0/1     Completed   0          2m15s
kube-bench-node-p9sl9     0/1     Completed   0          2m15s

# The results are held in the pod's logs
$ kubectl logs kube-bench-master-k7jdd
[INFO] 1 Master Node Security Configuration
[INFO] 1.1 API Server
...
镜像安全
Clair
Clair 是 CoreOS 开源的容器安全工具,用来静态分析镜像中潜在的安全问题。推荐将 Clair 集成到 Devops 流程中,自动对所有镜像进行安全扫描。
安装 Clair 的方法为:
git clone https://github.com/coreos/clair
cd clair/contrib/helm
helm dependency update clair
helm install clair
Clair 项目本身只提供了 API,在实际使用中还需要一个客户端(或集成Clair的服务)配合使用。比如,使用 reg 的方法为
# Install
$ go get github.com/genuinetools/reg

# Vulnerability Reports
$ reg vulns --clair https://clair.j3ss.co r.j3ss.co/chrome

# Generating Static Website for a Registry
$ $ reg server --clair https://clair.j3ss.co
trivy
trivy 是 Aqua Security 开源的容器漏洞扫描工具。相对于 Clair 来说,使用起来更为简单,可以更方便集成到 CI 中。
# Install
sudo apt-get install wget apt-transport-https gnupg lsb-release
wget -qO - https://aquasecurity.github.io/trivy-repo/deb/public.key | sudo apt-key add -
echo deb https://aquasecurity.github.io/trivy-repo/deb $(lsb_release -sc) main | sudo tee -a /etc/apt/sources.list.d/trivy.list
sudo apt-get update
sudo apt-get install -y trivy

# Image Scanning
trivy python:3.4-alpine
其他工具
其他镜像安全扫描工具还有:
- National Vulnerability Database
- OpenSCAP tools
- coreos/clair
- aquasecurity/microscanner
- Docker Registry Server
- GitLab Container Registry
- Red Hat Quay container registry
- Amazon Elastic Container Registry
- theupdateframework/notary
- weaveworks/flux
- IBM/portieris
- Grafeas
- in-toto
安全工具
开源产品:
- falco:容器运行时安全行为监控工具。
- docker-bench-security:Docker 环境安全检查工具。
- kube-hunter:Kubernetes 集群渗透测试工具。
- https://github.com/shyiko/kubesec
- Istio
- Linkerd
- Open Vulnerability and Assessment Language
- aporeto-inc/trireme-kubernetes
- jetstack/cert-manager
- Kata Containers
- google/gvisor
- SPIFFE
- Open Policy Agent
商业产品