部署 Windows 节点
Kubernetes 从 v1.5 开始支持 alpha 版的 Windows 节点,并从 v1.9 开始升级为 beta 版。Windows 容器的主要特性包括
- Windows 容器支持 Pod(isolation=process)
- 基于 Virtual Filtering Platform (VFP) Hyper-v Switch Extension 的内核负载均衡
- 基于 Container Runtime Interface (CRI) 管理 Windows 容器
- 支持 kubeadm 命令将 Windows 节点加入到已有集群中
- 推荐使用 Windows Server Version 1803+ 和 Docker Version 17.06+
注意:
- 控制平面的服务依然运行在 Linux 服务器中,而 Windows 节点上只运行 Kubelet、Kube-proxy、Docker 以及网络插件等服务。
- 推荐使用 Windows Server 1803(修复了 Windows 容器软链接的问题,从而 ServiceAccount 和 ConfigMap 可以正常使用)
下载
可以从 https://github.com/kubernetes/kubernetes/releases 下载已发布的用于 Windows 服务器的二进制文件,如
wget https://dl.k8s.io/v1.15.0/kubernetes-node-windows-amd64.tar.gz
或者从 Kubernetes 源码编译
go get -u k8s.io/kubernetes
cd $GOPATH/src/k8s.io/kubernetes

# Build the kubelet
KUBE_BUILD_PLATFORMS=windows/amd64 make WHAT=cmd/kubelet

# Build the kube-proxy
KUBE_BUILD_PLATFORMS=windows/amd64 make WHAT=cmd/kube-proxy

# You will find the output binaries under the folder _output/local/bin/windows/
网络插件
Windows Server 中支持以下几种网络插件(注意 Windows 节点上的网络插件要与 Linux 节点相同)
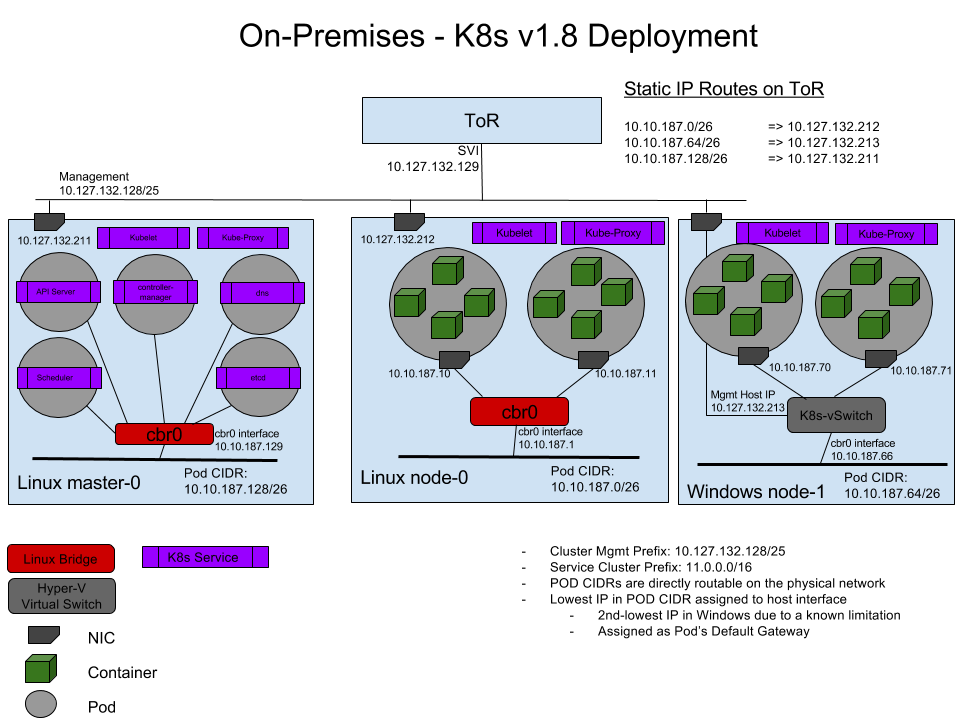
- wincni 等 L3 路由网络插件,路由配置在 TOR 交换机、路由器或者云服务中
- Azure VNET CNI Plugin
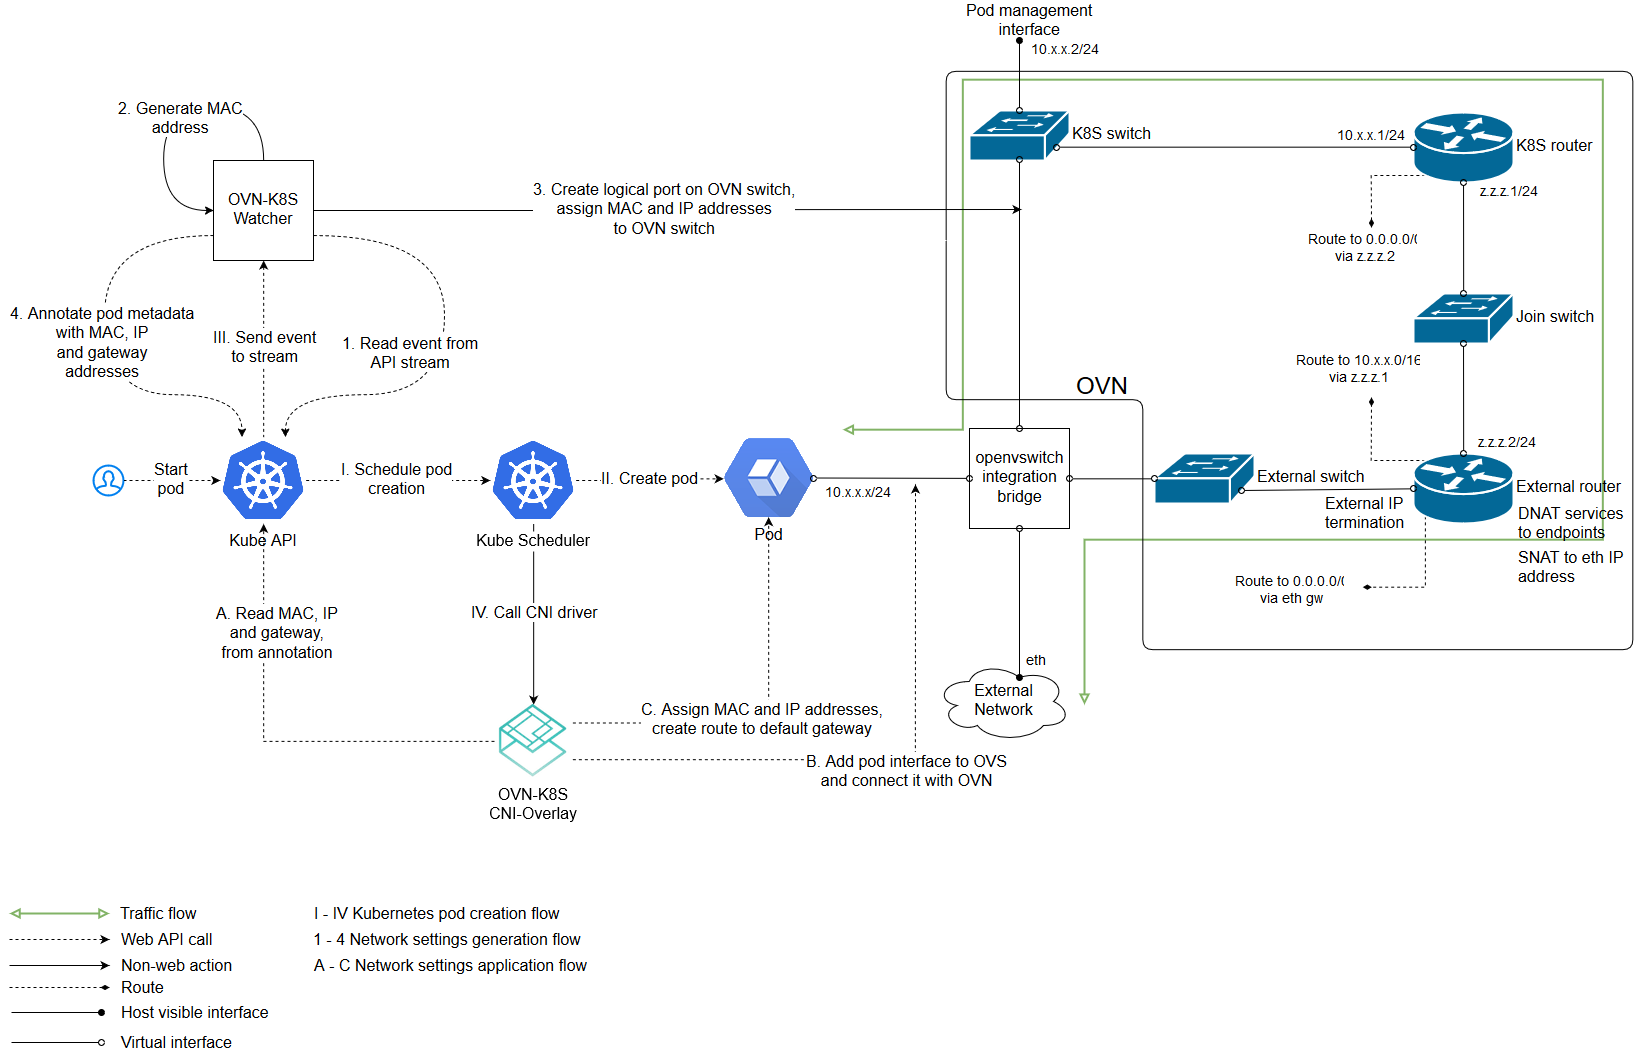
- Open vSwitch (OVS) & Open Virtual Network (OVN) with Overlay
- Flannel v0.10.0+
- Calico v3.0.1+
- win-bridge
- win-overlay
更多网络拓扑模式请参考 Windows container network drivers。
L3 路由拓扑

wincni 网络插件配置示例
{
  "cniVersion": "0.2.0",
  "name": "l2bridge",
  "type": "wincni.exe",
  "master": "Ethernet",
  "ipam": {
    "environment": "azure",
    "subnet": "10.10.187.64/26",
    "routes": [{
      "GW": "10.10.187.66"
    }]
  },
  "dns": {
    "Nameservers": [
      "11.0.0.10"
    ]
  },
  "AdditionalArgs": [{
      "Name": "EndpointPolicy",
      "Value": {
        "Type": "OutBoundNAT",
        "ExceptionList": [
          "11.0.0.0/8",
          "10.10.0.0/16",
          "10.127.132.128/25"
        ]
      }
    },
    {
      "Name": "EndpointPolicy",
      "Value": {
        "Type": "ROUTE",
        "DestinationPrefix": "11.0.0.0/8",
        "NeedEncap": true
      }
    },
    {
      "Name": "EndpointPolicy",
      "Value": {
        "Type": "ROUTE",
        "DestinationPrefix": "10.127.132.213/32",
        "NeedEncap": true
      }
    }
  ]
}
OVS 网络拓扑

部署
kubeadm
如果 Master 是通过 kubeadm 来部署的,那 Windows 节点也可以使用 kubeadm 来部署:
kubeadm.exe join --token <token> <master-ip>:<master-port> --discovery-token-ca-cert-hash sha256:<hash>
Azure
在 Azure 上面推荐使用 acs-engine 自动部署 Master 和 Windows 节点。
首先创建一个包含 Windows 的 Kubernetes 集群配置文件 windows.json
{
    "apiVersion": "vlabs",
    "properties": {
        "orchestratorProfile": {
            "orchestratorType": "Kubernetes",
            "orchestratorVersion": "1.11.1",
            "kubernetesConfig": {
                "networkPolicy": "none",
                "enableAggregatedAPIs": true,
                "enableRbac": true
            }
        },
        "masterProfile": {
            "count": 3,
            "dnsPrefix": "kubernetes-windows",
            "vmSize": "Standard_D2_v3"
        },
        "agentPoolProfiles": [
            {
                "name": "windowspool1",
                "count": 3,
                "vmSize": "Standard_D2_v3",
                "availabilityProfile": "AvailabilitySet",
                "osType": "Windows"
            }
        ],
        "windowsProfile": {
            "adminUsername": "<your-username>",
            "adminPassword": "<your-password>"
        },
        "linuxProfile": {
            "adminUsername": "azure",
            "ssh": {
                "publicKeys": [
                    {
                        "keyData": "<your-ssh-public-key>"
                    }
                ]
            }
        },
        "servicePrincipalProfile": {
            "clientId": "",
            "secret": ""
        }
    }
}
然后使用 acs-engine 部署:
# create a new resource group.
az group create --name myResourceGroup  --location "centralus"

# start deploy the kubernetes
acs-engine deploy --resource-group myResourceGroup --subscription-id <subscription-id> --auto-suffix --api-model windows.json --location centralus --dns-prefix <dns-prefix>

# setup kubectl
export KUBECONFIG="$(pwd)/_output/<name-with-suffix>/kubeconfig/kubeconfig.centralus.json"
kubectl get node
手动部署
(1) 在 Windows Server 中 安装 Docker
Install-Module -Name DockerMsftProvider -Repository PSGallery -Force
Install-Package -Name Docker -ProviderName DockerMsftProvider
Restart-Computer -Force
(2) 根据前面的下载部分下载 kubelet.exe 和 kube-proxy.exe
(3) 从 Master 节点上面拷贝 Node spec file (kube config)
(4) 配置 CNI 网络插件和基础镜像
[Net.ServicePointManager]::SecurityProtocol = [Net.SecurityProtocolType]::Tls12
wget https://github.com/Microsoft/SDN/archive/master.zip -o master.zip
Expand-Archive master.zip -DestinationPath master
mkdir C:/k/
mv master/SDN-master/Kubernetes/windows/* C:/k/
rm -recurse -force master,master.zip
docker pull microsoft/windowsservercore:1709
docker tag microsoft/windowsservercore:1709 microsoft/windowsservercore:latest
cd C:/k/
docker build -t kubeletwin/pause .
(5) 使用 start-kubelet.ps1 启动 kubelet.exe,并使用 start-kubeproxy.ps1 启动 kube-proxy.exe
[Environment]::SetEnvironmentVariable("KUBECONFIG", "C:\k\config", [EnvironmentVariableTarget]::User)
./start-kubelet.ps1 -ClusterCidr 192.168.0.0/16
./start-kubeproxy.ps1
(6) 如果使用 Host-Gateway 网络插件,还需要使用 AddRoutes.ps1 添加静态路由
详细的操作步骤可以参考 这里。
运行 Windows 容器
使用 NodeSelector beta.kubernetes.io/os: windows 将容器调度到 Windows 节点上,比如
apiVersion: extensions/v1beta1
kind: Deployment
metadata:
  name: iis
spec:
  replicas: 1
  template:
    metadata:
      labels:
        app: iis
    spec:
      nodeSelector:
        beta.kubernetes.io/os: windows
      containers:
      - name: iis
        image: microsoft/iis
        resources:
          limits:
            memory: "128Mi"
            cpu: 2
        ports:
        - containerPort: 80
---
apiVersion: v1
kind: Service
metadata:
  labels:
    app: iis
  name: iis
  namespace: default
spec:
  ports:
  - port: 80
    protocol: TCP
    targetPort: 80
  selector:
    app: iis
  type: NodePort
运行 DaemonSet
apiVersion: extensions/v1beta1
kind: DaemonSet
metadata:
  name: my-DaemonSet
  labels:
    app: foo
spec:
  template:
    metadata:
      labels:
        app: foo
    spec:
      containers:
      - name: foo
        image: microsoft/windowsservercore:1709
      nodeSelector:
        beta.kubernetes.io/os: windows
已知问题
Secrets 和 ConfigMaps 只能以环境变量的方式使用
1709和更早版本有这个问题,升级到 1803 即可解决。
Volume 支持情况
Windows 容器暂时只支持 local、emptyDir、hostPath、AzureDisk、AzureFile 以及 flexvolume。注意 Volume 的路径格式需要为 mountPath: "C:\\etc\\foo" 或者 mountPath: "C:/etc/foo"。
apiVersion: v1
kind: Pod
metadata:
  name: hostpath-pod
spec:
  containers:
  - name: hostpath-nano
    image: microsoft/nanoserver:1709
    stdin: true
    tty: true
    volumeMounts:
    - name: blah
      mountPath: "C:\\etc\\foo"
      readOnly: true
  nodeSelector:
    beta.kubernetes.io/os: windows
  volumes:
  - name: blah
    hostPath:
      path: "C:\\AzureData"
apiVersion: v1
kind: Pod
metadata:
  name: empty-dir-pod
spec:
  containers:
  - image: microsoft/nanoserver:1709
    name: empty-dir-nano
    stdin: true
    tty: true
    volumeMounts:
    - mountPath: /cache
      name: cache-volume
    - mountPath: C:/scratch
      name: scratch-volume
  volumes:
  - name: cache-volume
    emptyDir: {}
  - name: scratch-volume
    emptyDir: {}
  nodeSelector:
    beta.kubernetes.io/os: windows
镜像版本匹配问题
在 Windows Server version 1709 中必须使用带有 1709 标签的镜像,如
- microsoft/aspnet:4.7.1-windowsservercore-1709
- microsoft/windowsservercore:1709
- microsoft/iis:windowsservercore-1709
同样,在 Windows Server version 1803 中必须使用带有 1803 标签的镜像。而在 Windows Server 2016 上需要使用带有 ltsc2016 标签的镜像,如 microsoft/windowsservercore:ltsc2016。
设置 CPU 和内存
从 v1.10 开始,Kubernetes 支持给 Windows 容器设置 CPU 和内存:
apiVersion: apps/v1
kind: Deployment
metadata:
  name: iis
spec:
  replicas: 3
  template:
    metadata:
      labels:
        app: iis
    spec:
      containers:
      - name: iis
        image: microsoft/iis
        resources:
          limits:
            memory: "128Mi"
            cpu: 2
        ports:
        - containerPort: 80
Hyper-V 容器
从 v1.10 开始支持 Hyper-V 隔离的容器(Alpha)。 在使用之前,需要配置 kubelet 开启 HyperVContainer 特性开关。然后使用 Annotation experimental.windows.kubernetes.io/isolation-type=hyperv 来指定容器使用 Hyper-V 隔离:
apiVersion: apps/v1
kind: Deployment
metadata:
  name: iis
spec:
  replicas: 3
  template:
    metadata:
      labels:
        app: iis
      annotations:
        experimental.windows.kubernetes.io/isolation-type: hyperv
    spec:
      containers:
      - name: iis
        image: microsoft/iis
        ports:
        - containerPort: 80
其他已知问题
- 仅 Windows Server 1709 或更新的版本才支持在 Pod 内运行多个容器(仅支持 Process 隔离)
- 暂不支持 StatefulSet
- 暂不支持 Windows Server Container Pods 的自动扩展(Horizontal Pod Autoscaling)
- Windows 容器的 OS 版本需要与 Host OS 版本匹配,否则容器无法启动
- 使用 L3 或者 Host GW 网络时,无法从 Windows Node 中直接访问 Kubernetes Services(使用 OVS/OVN 时没有这个问题)
- 在 VMWare Fusion 的 Window Server 中 kubelet.exe 可能会无法启动(已在 #57124 中修复)
- 暂不支持 Weave 网络插件
- Calico 网络插件仅支持 Policy-Only 模式
- 对于需要使用
:作为环境变量的 .NET 容器,可以将环境变量中的:替换为__(参考 这里)
附录:Docker EE 安装方法
安装 Docker EE 稳定版本
Install-Module -Name DockerMsftProvider -Repository PSGallery -Force
Install-Package -Name docker -ProviderName DockerMsftProvider
Restart-Computer -Force
安装 Docker EE 预览版本
Install-Module DockerProvider
Install-Package -Name Docker -ProviderName DockerProvider -RequiredVersion preview
升级 Docker EE 版本
# Check the installed version
Get-Package -Name Docker -ProviderName DockerMsftProvider

# Find the current version
Find-Package -Name Docker -ProviderName DockerMsftProvider

# Upgrade Docker EE
Install-Package -Name Docker -ProviderName DockerMsftProvider -Update -Force
Start-Service Docker