Azure 容器实例(ACI)提供了在 Azure 中运行容器的最简捷方式,它不需要用户配置任何虚拟机或其它高级服务。ACI 适用于快速突发式增长和资源调整的业务,但功能相对比较简单。对于需要完整容器集群编排功能的场景建议使用 ACS 或 AKS。
ACI 的优势包括
- 不需要用户配置和管理虚拟机就可以提供虚拟机级别的安全隔离
- 启动快速
- 支持自定义大小
- 支持绑定公网IP和持久化存储
- 支持Linux 和 Windows 容器
- 支持容器组将多个容器运行在一起(类似于 Kubernetes Pod),它们共享相同的生命周期、网络协议栈、IP地址以及存储
- 可以通过aci-connector-k8s将 ACI 作为 Kubernetes 集群的一个无限 Node 使用
注意:目前 ACI 仅在 westus、eastus 和 westeurope 等区域开放。
入门示例
# 创建资源组
az group create --name myResourceGroup --location eastus

# 创建容器(对应 docker run)
az container create --name mycontainer --image microsoft/aci-helloworld --resource-group myResourceGroup --ip-address public

# 查询容器(对应 docker ps或 docker inspect)
az container show --name mycontainer --resource-group myResourceGroup [-o table/json]

# 查询容器日志
az container logs --name mycontainer --resource-group myResourceGroup

# 删除容器
az container delete --name mycontainer --resource-group myResourceGroup
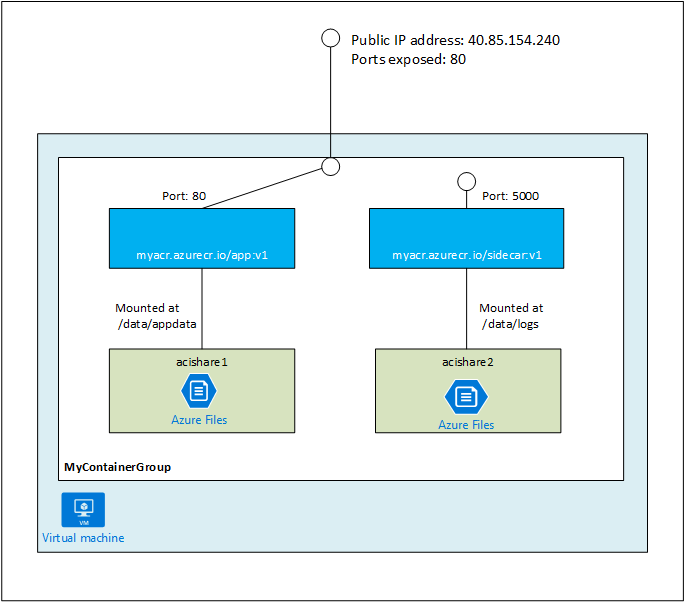
容器组
支持容器组将多个容器运行在一起(类似于 Kubernetes Pod),它们共享相同的生命周期、网络协议栈、IP地址以及持久化存储。容器组常以 sidecar 模式运行一组功能管理的容器,如应用程序和监控容器、应用程序和日志容器等。
目前,容器组仅支持以模板的方式来运行。模板格式为
{
  "$schema": "https://schema.management.azure.com/schemas/2015-01-01/deploymentTemplate.json#",
  "contentVersion": "1.0.0.0",
  "parameters": {
  },
  "variables": {
    "container1name": "aci-tutorial-app",
    "container1image": "microsoft/aci-helloworld:latest",
    "container2name": "aci-tutorial-sidecar",
    "container2image": "microsoft/aci-tutorial-sidecar"
  },
    "resources": [
      {
        "name": "myContainerGroup",
        "type": "Microsoft.ContainerInstance/containerGroups",
        "apiVersion": "2017-08-01-preview",
        "location": "[resourceGroup().location]",
        "properties": {
          "containers": [
            {
              "name": "[variables('container1name')]",
              "properties": {
                "image": "[variables('container1image')]",
                "resources": {
                  "requests": {
                    "cpu": 1,
                    "memoryInGb": 1.5
                    }
                },
                "ports": [
                  {
                    "port": 80
                  }
                ]
              }
            },
            {
              "name": "[variables('container2name')]",
              "properties": {
                "image": "[variables('container2image')]",
                "resources": {
                  "requests": {
                    "cpu": 1,
                    "memoryInGb": 1.5
                    }
                }
              }
            }
          ],
          "osType": "Linux",
          "ipAddress": {
            "type": "Public",
            "ports": [
              {
                "protocol": "tcp",
                "port": "80"
              }
            ]
          }
        }
      }
    ],
    "outputs": {
      "containerIPv4Address": {
        "type": "string",
        "value": "[reference(resourceId('Microsoft.ContainerInstance/containerGroups/', 'myContainerGroup')).ipAddress.ip]"
      }
    }
  }
而部署容器组也需要使用 az group deployment 命令
az group deployment create --name myContainerGroup --resource-group myResourceGroup --template-file azuredeploy.json
部署成功后就可以通过 az container 命令来查看或操作容器了(使用 --container-name 指定操作的是哪个容器)。
私有镜像
私有镜像可以存储在 Azure 容器注册表(ACR)中。
# Create ACR
az acr create --resource-group myResourceGroup --name <acrName> --sku Basic --admin-enabled true

# Login
az acr login --name <acrName>

# Tag the image.
az acr list --resource-group myResourceGroup --query "[].{acrLoginServer:loginServer}" --output table
docker tag azure-vote-front <acrLoginServer>/azure-vote-front:redis-v1

# push image
docker push <acrLoginServer>/azure-vote-front:redis-v1

# List images.
az acr repository list --name <acrName> --output table
使用私有镜像创建容器时,需要通过 --registry-password 选项给每个容器设置密码(比 docker login 麻烦一些):
# Query password.
az acr credential show --name <acrName> --query "passwords[0].value"
# Create container.
az container create --name aci-tutorial-app --image <acrLoginServer>/aci-tutorial-app:v1 --cpu 1 --memory 1 --registry-password <acrPassword> --ip-address public --ports 80 -g myResourceGroup
或者在部署模板(比如上述容器组示例)中设置
"imageRegistryCredentials": [
    {
    "server": "[parameters('imageRegistryLoginServer')]",
    "username": "[parameters('imageRegistryUsername')]",
    "password": "[parameters('imageRegistryPassword')]"
    }
]
持久化存储
必须先创建 Azure 文件共享,才能将其用于 Azure 容器实例。
# Create the storage account
az storage account create -n mycontainerstorage -g myResourceGroup  --sku Standard_LRS

# Export the connection string as an environment variable, this is used when creating the Azure file share
AZURE_STORAGE_CONNECTION_STRING=$(az storage account show-connection-string -n mycontainerstorage -g myResourceGroup -o tsv)

# Create the share
az storage share create -n myacishare

# Get storage account key.
STORAGE_ACCOUNT="mycontainerstorage"
STORAGE_KEY=$(az storage account keys list --resource-group myResourceGroup --account-name mycontainerstorage --query "[0].value" -o tsv)
持久化存储也是需要通过模板来引用,创建下面的模板文件
{
  "$schema": "https://schema.management.azure.com/schemas/2015-01-01/deploymentTemplate.json#",
  "contentVersion": "1.0.0.0",
  "parameters": {
    "storageaccountname": {
      "type": "string"
    },
    "storageaccountkey": {
      "type": "securestring"
    }
  },
  "resources":[{
    "name": "hellofiles",
    "type": "Microsoft.ContainerInstance/containerGroups",
    "apiVersion": "2017-08-01-preview",
    "location": "[resourceGroup().location]",
    "properties": {
      "containers": [{
        "name": "hellofiles",
        "properties": {
          "image": "seanmckenna/aci-hellofiles",
          "resources": {
            "requests": {
              "cpu": 1,
              "memoryInGb": 1.5
            }
          },
          "ports": [{
            "port": 80
          }],
          "volumeMounts": [{
            "name": "myvolume",
            "mountPath": "/aci/logs/"
          }]
        }
      }],
      "osType": "Linux",
      "ipAddress": {
        "type": "Public",
        "ports": [{
          "protocol": "tcp",
          "port": "80"
        }]
      },
      "volumes": [{
        "name": "myvolume",
        "azureFile": {
          "shareName": "myacishare",
          "storageAccountName": "[parameters('storageaccountname')]",
          "storageAccountKey": "[parameters('storageaccountkey')]"
        }
      }]
    }
  }]
}
最后部署容器
# deploy container group
az group deployment create --name hellofilesdeployment --template-file hellofiles.json --resource-group myResourceGroup --parameters storageaccountname=$STORAGE_ACCOUN storageaccountkey=$STORAGE_KEY

# list container
az container list -g myResourceGroup -o table
Kubernetes集成
aci-connector-k8s 可以将 ACI 作为 Kubernetes 集群的一个无限 Node 使用。
下载 aci-connector-k8s 源码后,可以运行 examples/generateManifest.py 命令自动生成一个部署 aci-connector 的配置(不包含RBAC配置)。
python3 generateManifest.py -g myResourceGroup -s <my-subscription-id> -l westus
而在开启RBAC的系统中,需要配置相应的权限,比如使用下面的部署文件
apiVersion: extensions/v1beta1
kind: Deployment
metadata:
  name: aci-connector
  namespace: default
spec:
  replicas: 1
  template:
    metadata:
      labels:
        app: aci-connector
    spec:
      serviceAccount: aci-connector
      containers:
      - name: aci-connector
        image: microsoft/aci-connector-k8s:latest
        imagePullPolicy: Always
        env:
        - name: AZURE_CLIENT_ID
          value: <your-client-id>
        - name: AZURE_CLIENT_KEY
          value: <your-client-key>
        - name: AZURE_TENANT_ID
          value: <your-tenant-id>
        - name: AZURE_SUBSCRIPTION_ID
          value: <your-subsription-id>
        - name: ACI_RESOURCE_GROUP
          value: <your-resource-group>
---
apiVersion: v1
kind: ServiceAccount
metadata:
  name: aci-connector
---
apiVersion: v1
kind: List
items:
- apiVersion: rbac.authorization.k8s.io/v1
  kind: ClusterRole
  metadata:
    name: "aci-connector"
  rules:
  - apiGroups: [""]
    resources: ["namespaces"]
    verbs:     ["get", "list", "watch"]
  - apiGroups: [""]
    resources: ["pods", "pods/status"]
    verbs:     ["get","list","watch","create","patch","update","delete"]
  - apiGroups: [""]
    resources: ["nodes", "nodes/status"]
    verbs:     ["get","list","watch","create","patch","update","delete"]
- apiVersion: rbac.authorization.k8s.io/v1
  kind: ClusterRoleBinding
  metadata:
    name: "aci-connector"
  roleRef:
    apiGroup: rbac.authorization.k8s.io
    kind: ClusterRole
    name: "aci-connector"
  subjects:
  - apiGroup: ""
    kind: ServiceAccount
    name: "aci-connector"
    namespace: "default"
这样,Deployment部署后,很快就可以发现它自动创建了一个 aci-connector 的 Node
# kubectl get node aci-connector
NAME            STATUS    ROLES     AGE       VERSION
aci-connector   Ready     <none>    1m        v1.6.6
这样,Pod可以通过指定 nodeName 或者容忍 taint azure.com/aci=NoSchedule 调度到ACI上面:
apiVersion: v1
kind: Pod
metadata:
  name: nginx
  labels:
    run: nginx
spec:
  containers:
  - image: nginx
    imagePullPolicy: Always
    name: nginx
  dnsPolicy: ClusterFirst
  nodeName: aci-connector
# kubectl get pods -l run=nginx -o wide
NAME                    READY     STATUS    RESTARTS   AGE       IP              NODE
nginx                   1/1       Running   0          28s       x.x.x.x         aci-connector

# az container list -g myResourceGroup -o table
Name    ResourceGroup    ProvisioningState    Image    IP:ports          CPU/Memory       OsType    Location
------  ---------------  -------------------  -------  ----------------  ---------------  --------  ----------
nginx   myResourceGroup  Succeeded            nginx    x.x.x.x:80        1.0 core/1.5 gb  Linux     westus